Sign Git Commits Securely With Vaulted SSH Keys
by Ricky White

As a developer, you want to ensure your customers and users stay safe. You want your users to be assured that the code they are running is helpful, as bug-free as possible, secure, and free from malware and other potential malicious intents.
In this tutorial, you will learn:
- Why signing
gitcommits is essential. - Why and how to vault your SSH keys.
- Use the zero-knowledge Keeper Secrets Manager(KSM) to sign your commits.
- How to verify that your commits are signed.
If you have never signed git commits, let’s dive into why this can be critical.
Why Sign Commits?
Signing git commits is crucial for ensuring the authenticity and integrity of code changes in a collaborative software development environment.
When developers sign their commits with their SSH or GPG (GNU Privacy Guard) keys, it provides cryptographic proof that the code was indeed authored by the claimed developer and has not been tampered with since the commit was made.
This verification process is essential in maintaining the trustworthiness of a codebase, as unsigned commits can potentially be maliciously altered by unauthorized users. Without signed commits, there is a significant security risk of unauthorized code changes going undetected, leading to potential vulnerabilities, data breaches, or the introduction of malware into the codebase.
In essence, signing git commits helps establish a trust chain,
safeguarding software projects’ integrity and security.
However, to secure the chain of trust , you must also secure the signing key. Let’s dig into why you should vault your SSH keys and what can happen if you keep them on your local hard disk.
Vaulting SSH Keys
Storing SSH keys used to sign git commits in a secure vault,
such as Keeper Security, is a highly advisable practice for several reasons.
First and foremost, it enhances the overall security of the development process by protecting the private keys from unauthorized access or theft. Vaults like Keeper Security offer robust encryption and access control mechanisms, making it extremely difficult for malicious actors to compromise these critical keys.
Additionally, it simplifies key management, ensuring that keys are easily accessible to authorized users when needed but remain well-protected at all other times.
Furthermore, centralized key storage facilitates auditing and monitoring, enabling organizations to track key usage, detect suspicious activities, and promptly respond to security incidents. Using a dedicated vault for SSH keys adds an extra layer of security and control, mitigating the risks associated with key mismanagement and unauthorized access.
Now you know why storing SSH keys in a vault is necessary, let’s look at how you can utilize Keeper Security’s Vault and Secrets Manager to use that vaulted SSH key in your workflow.
Why use Keeper’s Integration
Keeper’s git integration is open source.
This means you have visibility and transparency into the software components and their dependencies,
ensuring your software Bill of Materials (SBOM) is accurate.
Any bugs and security updates are dealt with in the open,
and you can view the source code and its development on GitHub
.
Please ‘star’ the project for notifications when new releases are released.
Keeper Vault and KSM setup
To use the git integration to sign your commits with an SSH key in the Keeper Vault,
you must have a Keeper for Business account.
You can sign up for a free trial
if you don’t yet use Keeper.
Create a Shared Folder and SSH Key Record
Before you create a record in Keeper for your SSH Key, you must create a shared folder for the record to be saved into. This cannot be a regular folder, as the KSM cannot access it otherwise. Later, you will set up a Secrets Manager Application to access this folder, and only this folder, so that it can read your SSH Key.
Once you have created your shared folder, you can create a new record of type ‘SSH Key’ and copy your private and public key information to the record. You can get those with:
# Private Key
cat .ssh/mykeyfile

# Public Key
cat .ssh/mykeyfile.pub
Once your key is saved into Keeper Vault, you should delete private and public keys from your computer’s hard disk.
KSM Setup and Configuration
The git integration uses the zero-knowledge KSM provided by Keeper to fetch your SSH keys private key from the vault securely.
Therefore, you must ensure that a) the KSM addon is enabled
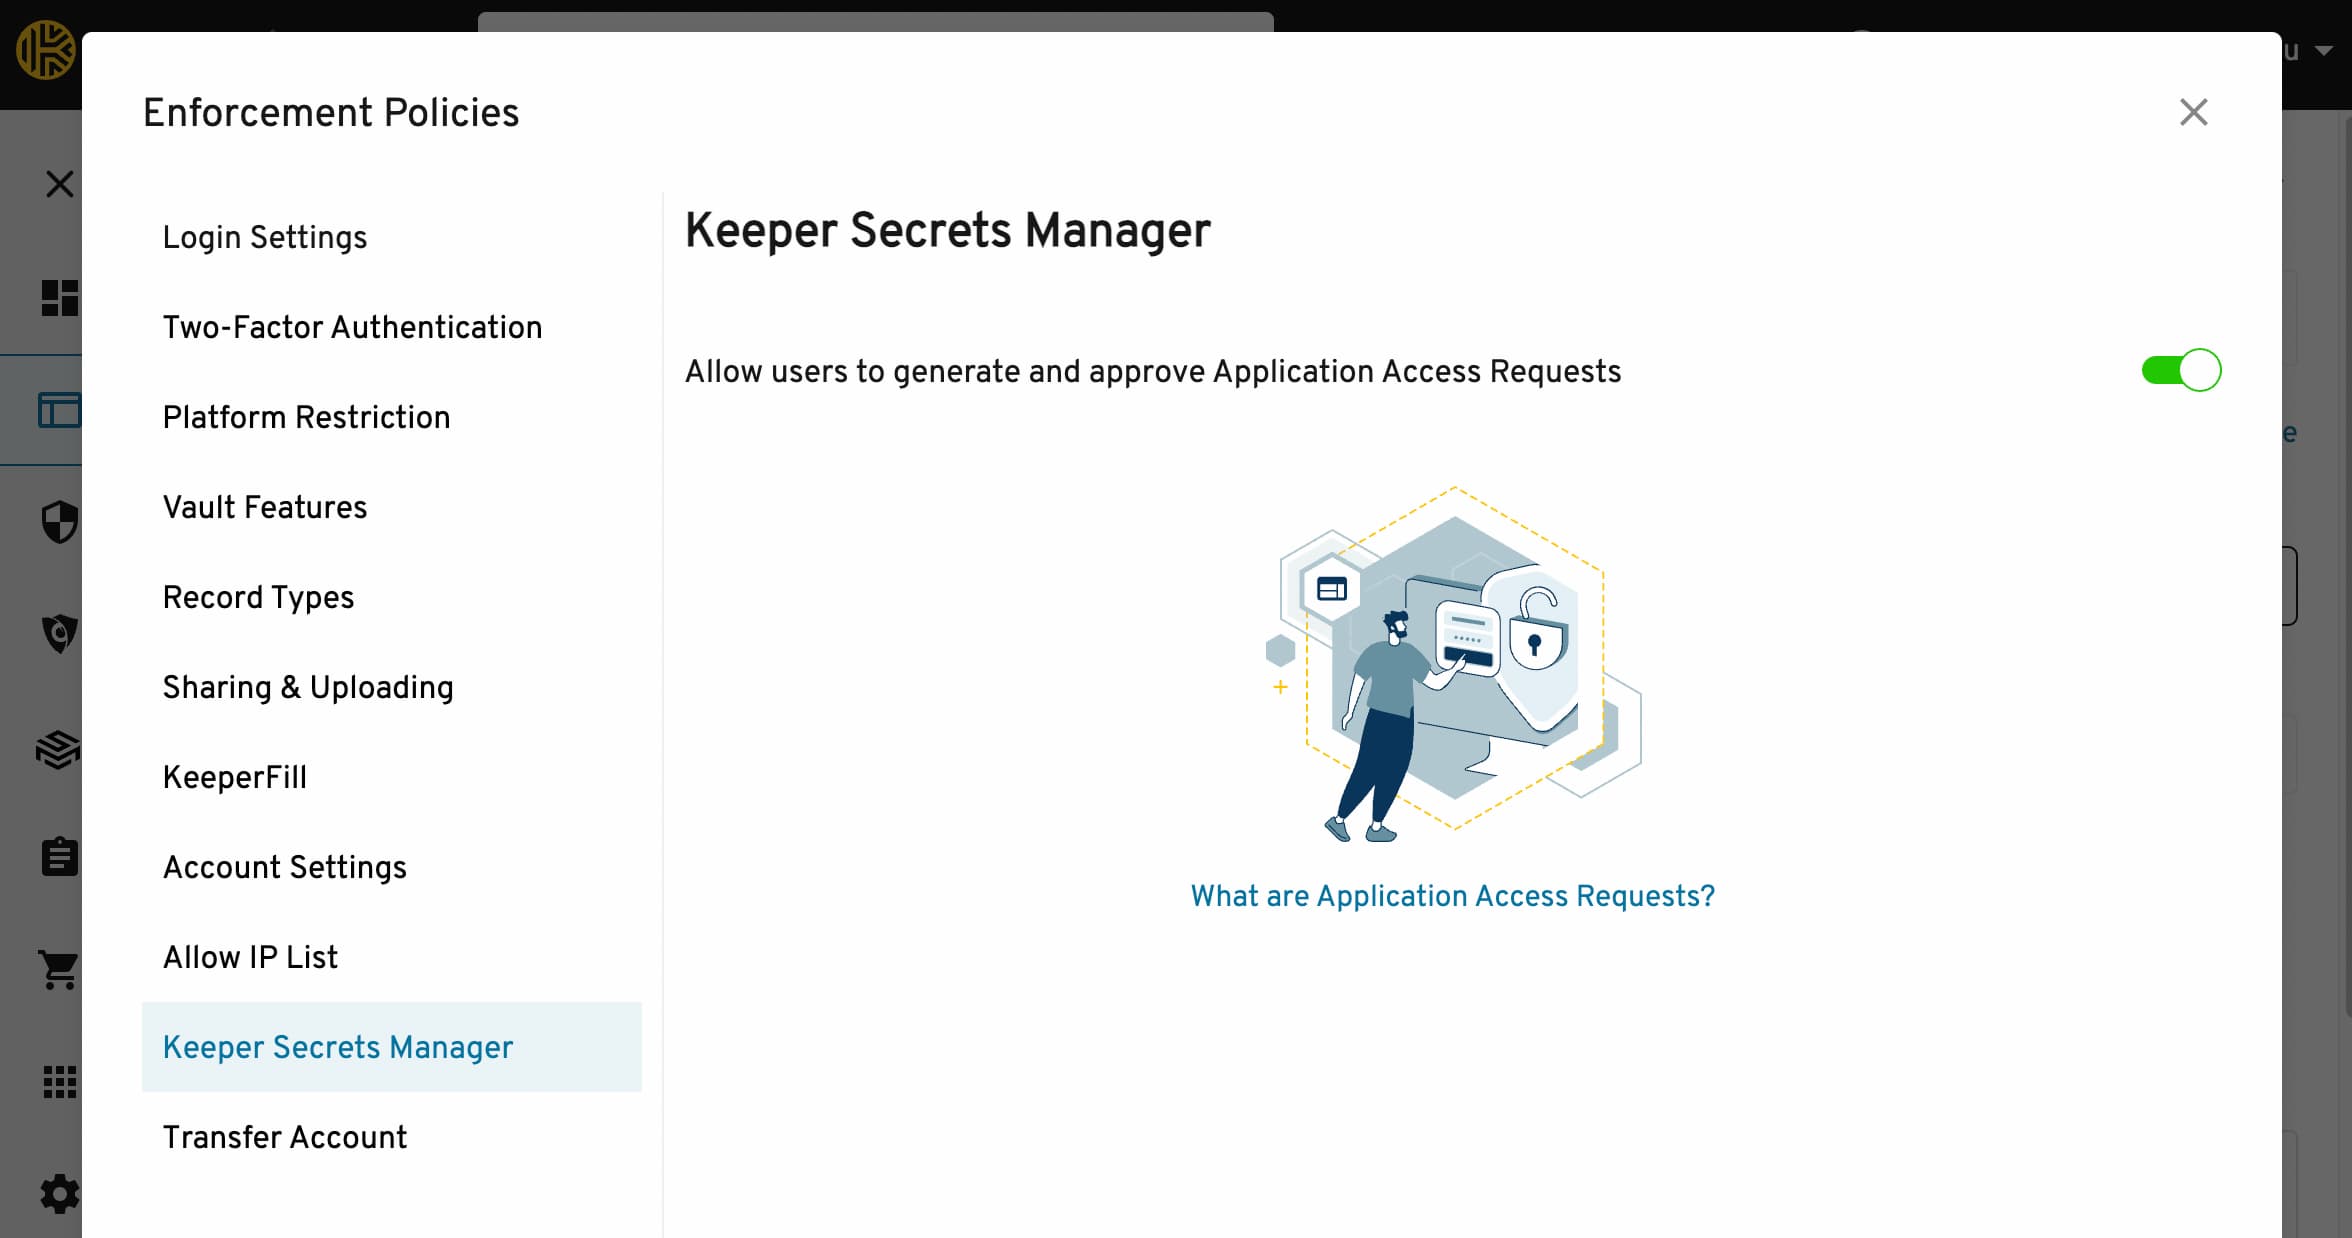
for your account and b) you are assigned a role with the Secrets Management enforcement policy enabled
.
Follow the linked documentation above for detailed instructions on setting up your account to access the KSM.

Once access to the KSM is available on your account, a Secrets Manager Application can be created.
This Application will access the shared folder you created in which you stored your SSH Key.
The configuration file for the Application should be saved to .config/keeper/ssh-sign.json in the user’s home directory for all systems.
If this configuration is not found, it will check ssh-sign.json as a backup.
The integration only accepts the JSON format of the configuration.
For help in setting up your Application and obtaining your configuration file, you can find detailed instructions here
Now you have your KSM configured and your SSH signing key vaulted,
the final step is to configure git itself to automatically sign your commits with your chosen SSH Key from the Vault.

Git Configuration
The ability to sign git commits with SSH keys (as opposed to GPG) was added in git version 2.34.0
.
You can check your version of git with git --version.
To successfully configure git to automatically sign your commits,
you will need to add four pieces of information to your git config.
You need to:
- Tell
gityou want to sign all commits. - Tell
gityou want to use SSH signing over the default GPG signing. - Tell
gitthe location of the Keepergit-ssh-signexecutable ( download here ). - Tell
gitthe UID of the SSH key to be used to sign commits.
You can do this for the local git repository with the below commands or add the --global flag to set settings globally for all repos.
If configuring locally on a single repo, be sure your current working directory is where the root of the project where your .git folder is located.
# Require all commits to be signed
git config commit.gpgsign true

# Change the default signing format to SSH
git config gpg.format ssh

# Update the path to the git-ssh-sign binary.
git config gpg.ssh.program <path to this binary>

# Replace <SSH Key UID> with your SSH keys UID
git config user.signingkey <SSH Key UID>
Additionally, it is also recommended that you sign all your git tags, too.
This can be achieved with git config tag.gpgsign true.
Your git config will now include these attributes:
[user]
signingKey = <SSH Key UID>
[commit]
gpgsign = true
[tag]
gpgsign = true
[gpg]
format = ssh
[gpg "ssh"]
program = path/to/git-ssh-sign
Signing Commits
Now you have both the KSM and git configured, all your commits will be signed automatically,
whether you are using the command line or your IDE integration.
Setting gpgsign = true removed the need to add the -S flag to git commit or git tag to sign them.
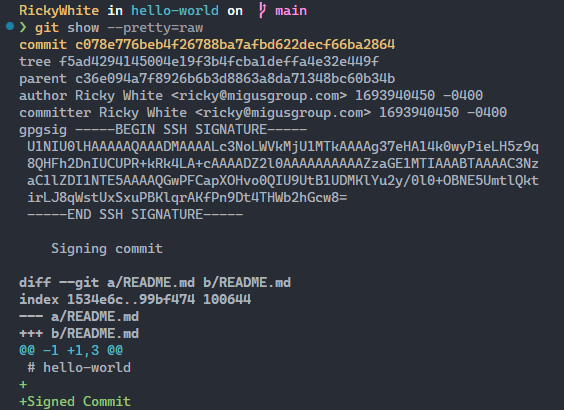
To confirm your latest commit was signed, you can view the signature attached to the commit with git show --pretty=raw.

GitHub Verification
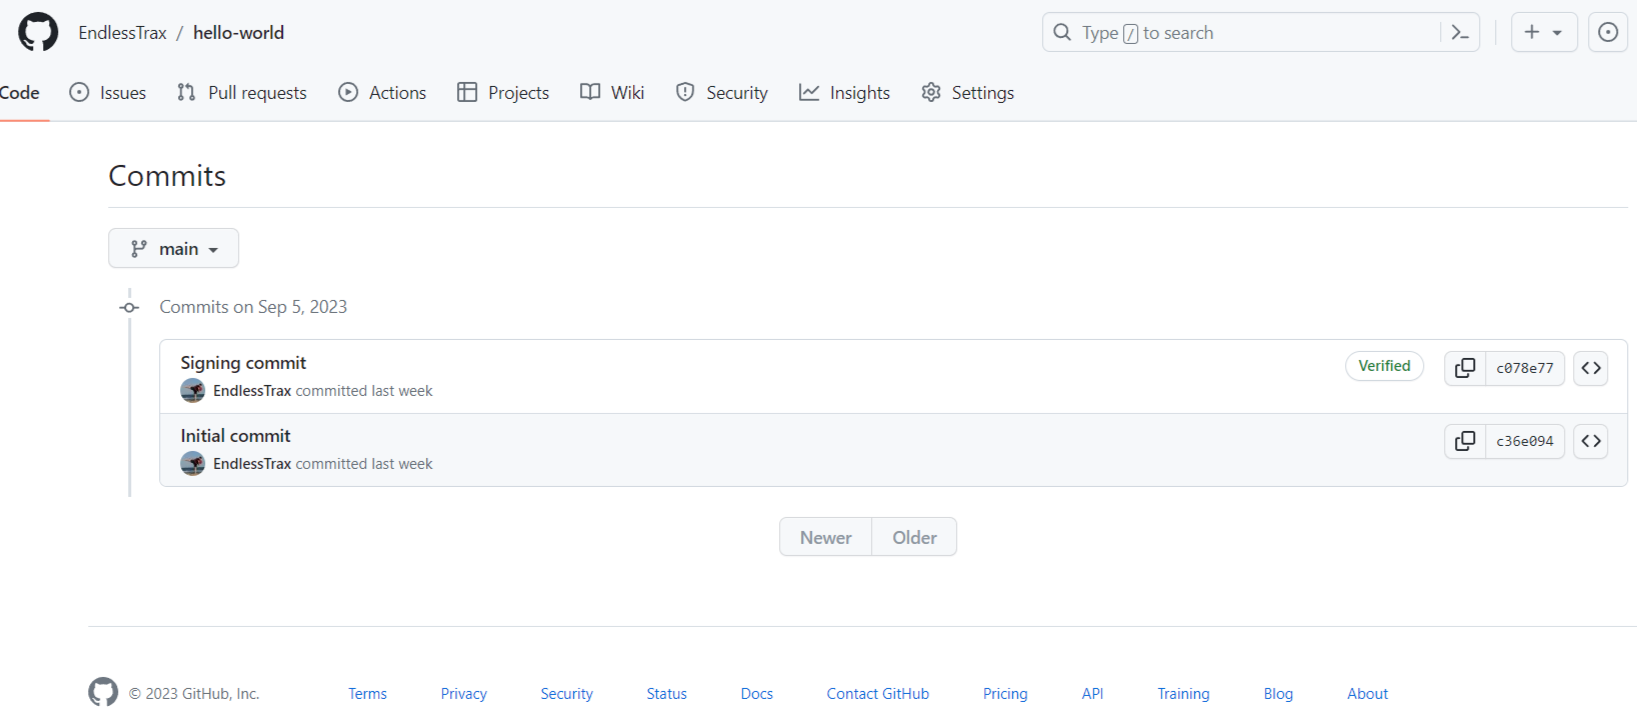
If your project is hosted on GitHub, you can show users in the UI that your commits are not only signed but verified. GitHub has excellent documentation on how to add your SSH key to your account for verification. All your commits will now show the green ‘verified’ mark.

Conclusion
Signing git commits is crucial for ensuring the authenticity and integrity of code changes in a collaborative software development environment.
It provides cryptographic proof that the code was indeed authored by the claimed developer and has not been tampered with since the commit was made.
This verification process is essential in maintaining the trustworthiness of a codebase, as unsigned commits can potentially be maliciously altered by unauthorized users.
To secure the chain of trust, you must also secure the signing key by storing SSH keys used to sign git commits in a secure vault, such as Keeper Security.
If you need help rolling this integration out to all your developers or want to see what Keeper Security can offer you regarding features and security compliance, contact us today.